
Something I do enjoy doing is building PC’s. I stopped doing this for people many years ago, when the likes of Dell became aggressively priced. I would put together a PC for say £600, but then they would need to get a monitor and maybe a printer, or they could go to Dell and for the same price get monitor, keyboard, mouse, printer and potentially speakers etc. Other than an occasional build for myself (rare treat), generally I would refer people to ‘pre-built, shop bought’ machines. Recently I have watched a fair few videos on the Linus Tech Tips YouTube channel and fancied building myself a Corsair/ASUS/AMD machine. I really fancied some of the RGB goodness, and I prefer the look of water-cooling over air cooling. From what was my current machine, I will be reusing my AMD Ryzen 9 3900X CPU, Corsair RGB RAM and my trusty old ASUS ROG STRIX 1050 graphics card.
I did think about doing this as a video but as I was doing it in dribs and drabs throughout the evening, I decided to take photo’s instead and do a blog post about it. It’s no secret, I am a fan of the ASUS product range. I am using the ASUS PN50 for my home lab environment, they are all running AMD Ryzen 5 CPU’s. I used to use AMD processors back in the days of the Athlon and before. It was only really when Intel brought out the Core 2 processors that I switched.
Please note that this post is not sponsored by anybody. I purchased the equipment myself from scan.co.uk.
What is it then?
Well, everyone loves a good spec sheet, we know that! So what spec will the new PC be? As mentioned earlier, I am re-purposing the AMD Ryzen 9 3900X CPU, some Corsair RAM and my ASUS ROG STRIX 1050 graphics card. The RAM and CPU are relatively new, the GPU is a few years old now, but works well for my monitors. I would have got an AMD 6700 XT graphics card, but with the chip shortages, those that are available are nearly double MSRP, I just couldn’t warrant this. I will keep an eye out on the AMD web page for availability and try and grab one. So, what do we have?
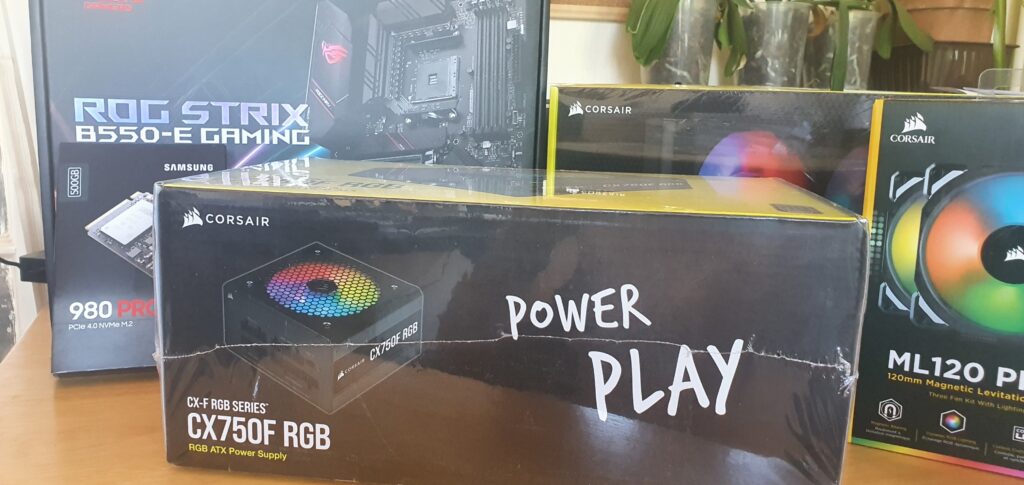
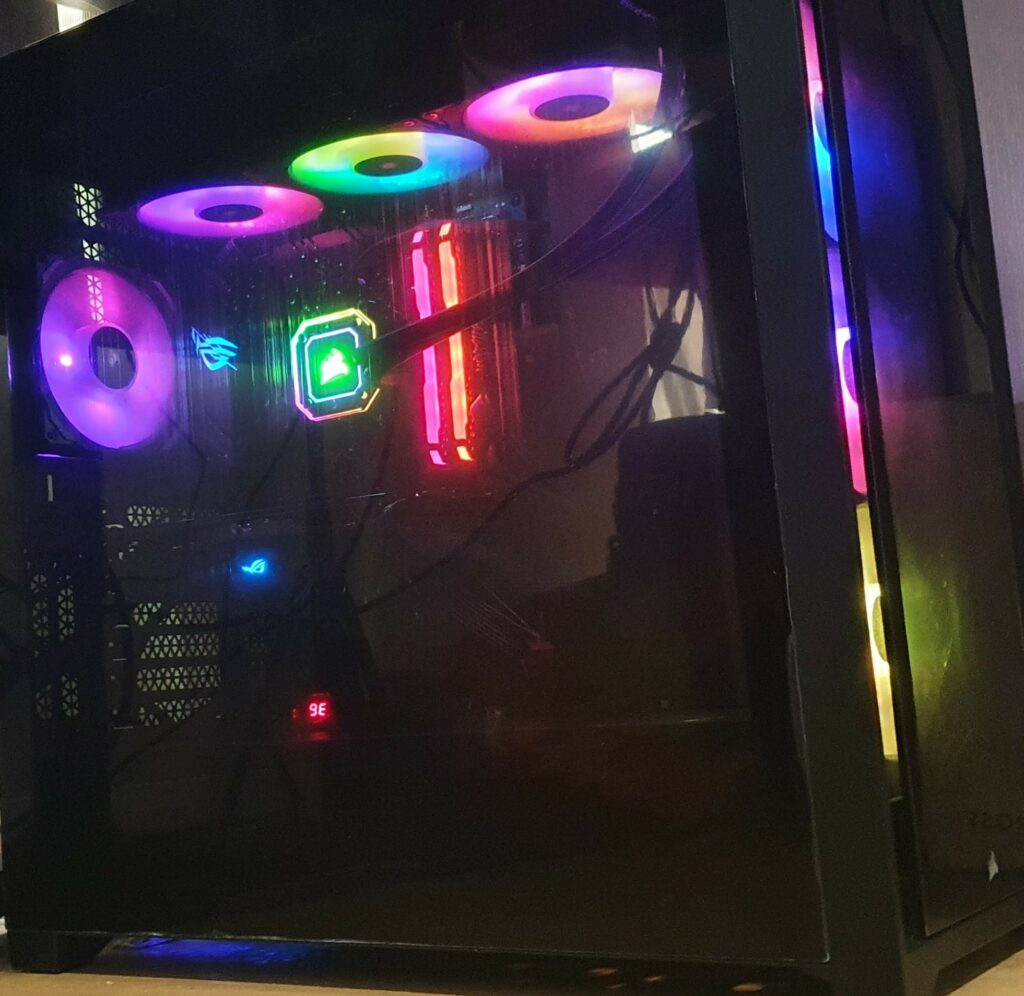
Starting at the back, we now have an ASUS ROG STRIX B550-E Gaming motherboard. This motherboard appears to be a good board, plenty of I/O, pre-mounted I/O shield, overclockable, Wifi, RGB and PCIe 4 ready for the Ryzen 9. Speaking of PCIe 4, next we have a Samsung 980 Pro 500GB M.2 drive. This will be the primary drive for installing the OS, Apps etc. My data will remain on my slightly older Ryzen 5 based system. Next, to cool the Ryzen 9, I will be using the Corsair iCUE H150i Elite Capellix AIO Liquid cooler. I hadn’t seen these AIO’s before, they were new to me. Last time I dabbled with water-cooling it was with a custom system that ran coolant that would glow under UV. As a result, I was keen to see how these worked and went together. For a power supply, I went with the Corsair CX750F with RGB. The main reasons for this were the full modular setup and the RGB. It should allow me to run a better graphics card when prices return to normal. Lastly, not in this picture, is the case. The case I chose was the Corsair iCUE 5000X RGB case. This case was chosen as it has plenty of cable management, looked good, housed the water cooler, oh and the RGB. The case comes with 3 fans, I wanted an extra fan for the rear but could only buy a 3-pack of the ML120 120mm RGB fans. When I can get hold of a single fan, I will look to add the 3 fans to the front left of the case.
Lets crack on then
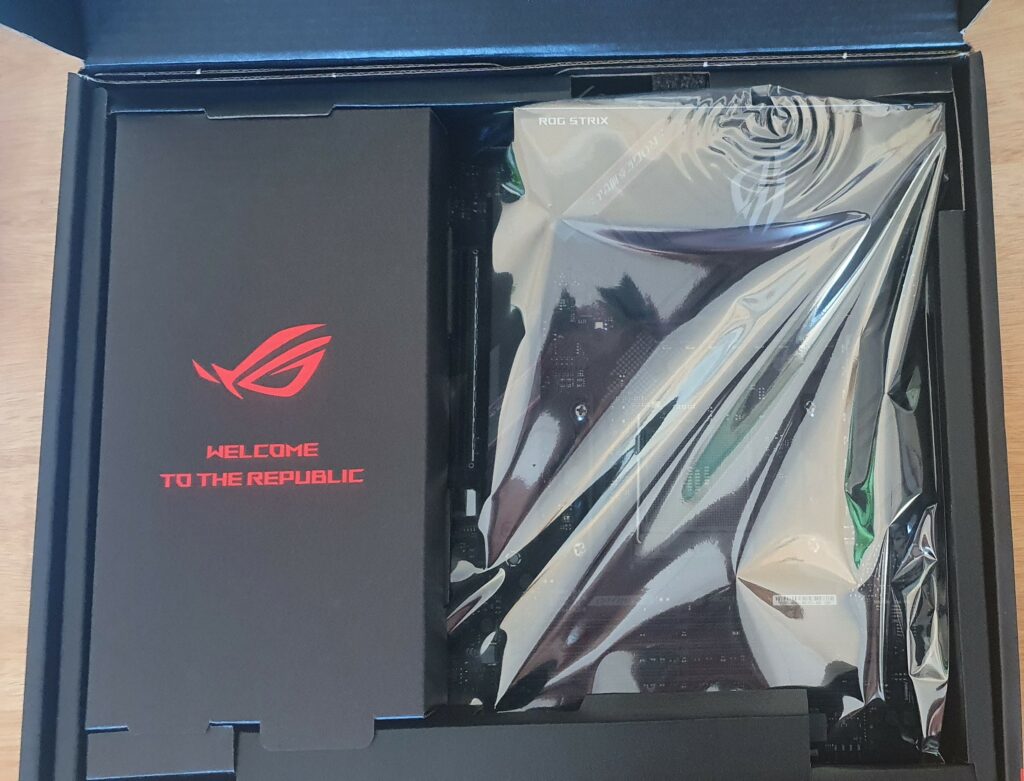
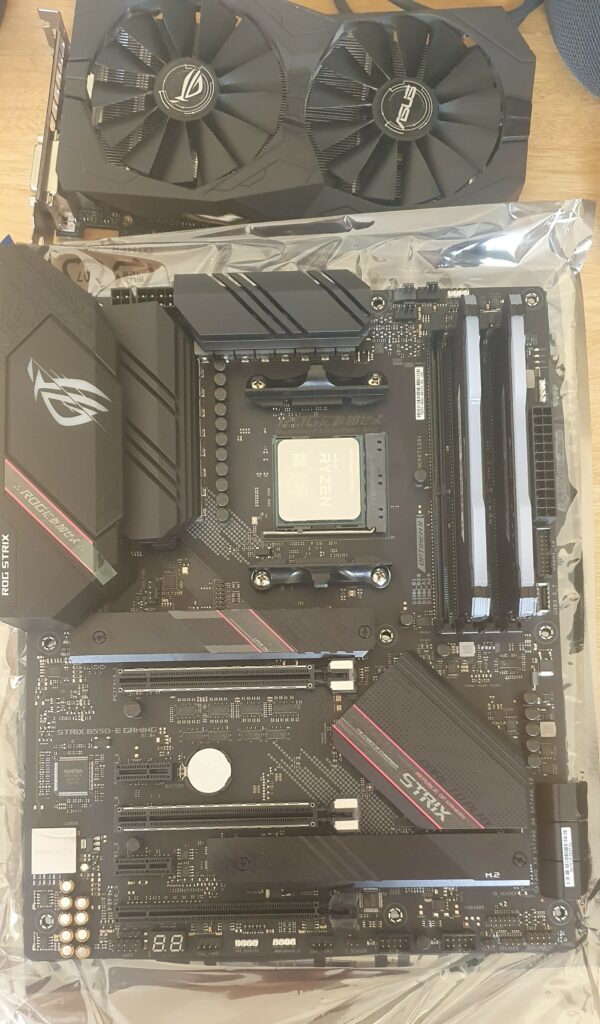
I think this is the first ASUS ROG motherboard I have had, despite using ASUS motherboards for as long as I can remember. Opening the box and being greeted with this just felt really nice. The box on the left contains the antenna for the built in Wi-Fi. After unboxing the motherboard, I installed the RAM and the CPU ready for mounting in the case. The M.2 SSD was installed in the upper M.2 slot for PCIe 4 performance, although it’s hidden by the heat spreader.
With the motherboard ready to go in it’s new home, it’s time to prepare said palace! This case was bigger than I was expecting, in fairness I didn’t use a tape measure beforehand but still I was a little nervous about the size. This soon stopped as soon as I was putting it all together.
With all the panels removed ready for routing cables, first thing I did was mount the motherboard
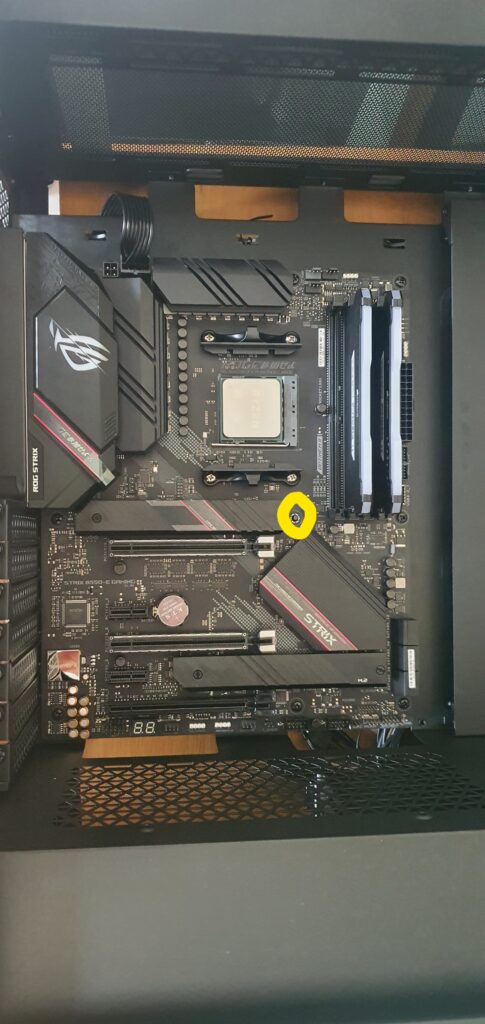
Mounting the motherboard provided my first ‘oh wow’ moment. In the picture above, I have drawn a yellow circle around something I have not had on a case before. It was a locating lug! Where a normal screw would go, Corsair have a small peg that will help hold the board in place, especially whilst installing it in an upright fashion, whilst you get the board screwed in place. The addition of the built in I/O shield on the motherboard stops you from forgetting to fit it first! These are two fantastic touches that I came across.
Next up, the part I was excited about, the water-cooling! Complete with RGB. This is where I ended up doing searches online. Corsair supply the mounting kit, obviously. Part of this mounting kit are screws for mounting the fans to the radiator, and the radiator on to the case. Supplied are two lengths of screw, a short one for the case to radiator and a long one for fan to radiator. When sizing up the long screws it very quickly became clear that the screws would interfere with the fins on the radiator. This had me nervous, obviously. I was worried that the screws would damage the cooling pipes inside and I would end up with coolant everywhere. I found loads of Reddit posts where people were commenting “yes, it’s an unnatural amount of force needed to screw them in”. OK, but what about the interference? Well, I eventually found The Provoked Prawn’s YouTube video showing the exact issue I was having and they showed how they bent the fins out of the way before putting the screws in. So, it’s a known issue if you like. That makes me feel better. And the screws don’t interfere with the pipes and I won’t end up with a waterfall/fountain.
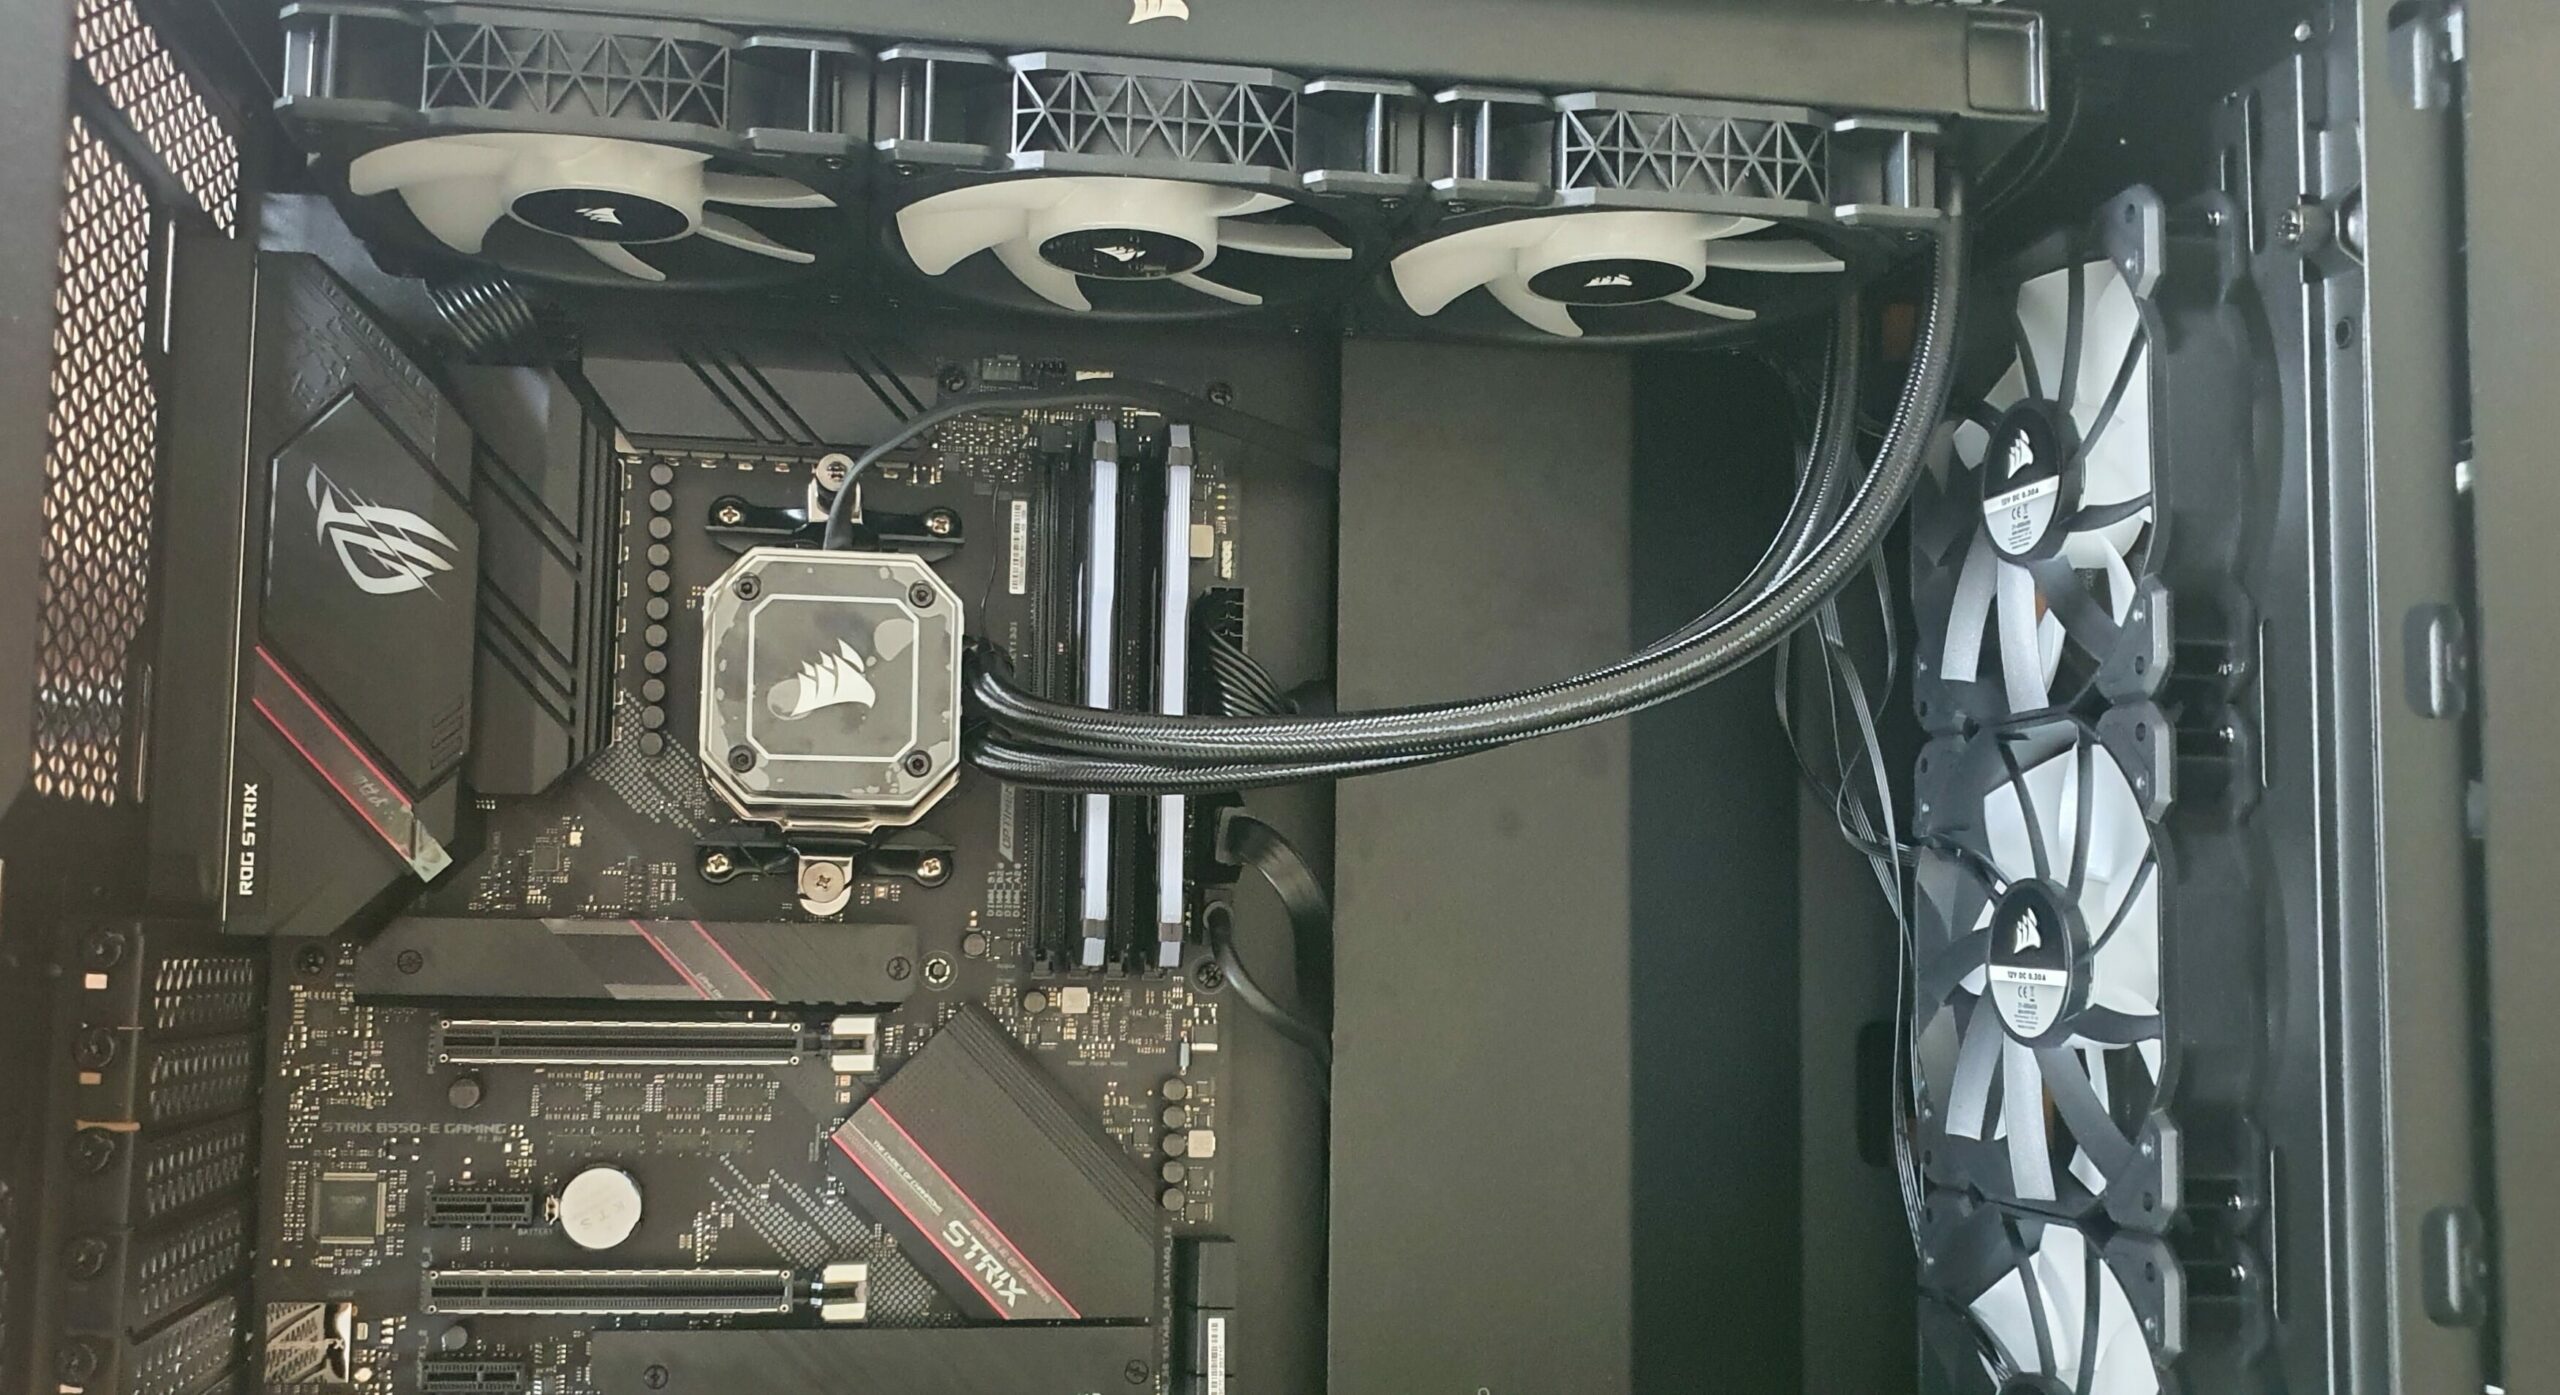
After the debacle (I spent far too long trying to find answers to this) with the screw lengths, I got the water-cooler all mounted up and in place. They do look very neat these AIO cooling solutions. I will run through the performance later. It was after getting the radiator and cooling block/pump mounted, I realised I made a mistake. Just to the left of the front fans, is a cover/air flow/cable management panel. I should have taken this off and routed things like the main ATX power cable and front I/O cable before mounting the radiator. Looking at the picture above, I would also probably change the routing of the PCIe GPU power cable so that it drops straight down and underneath the board rather than going through the channel. You can also see the additional rear mounted ML120 fan mounted at the back.
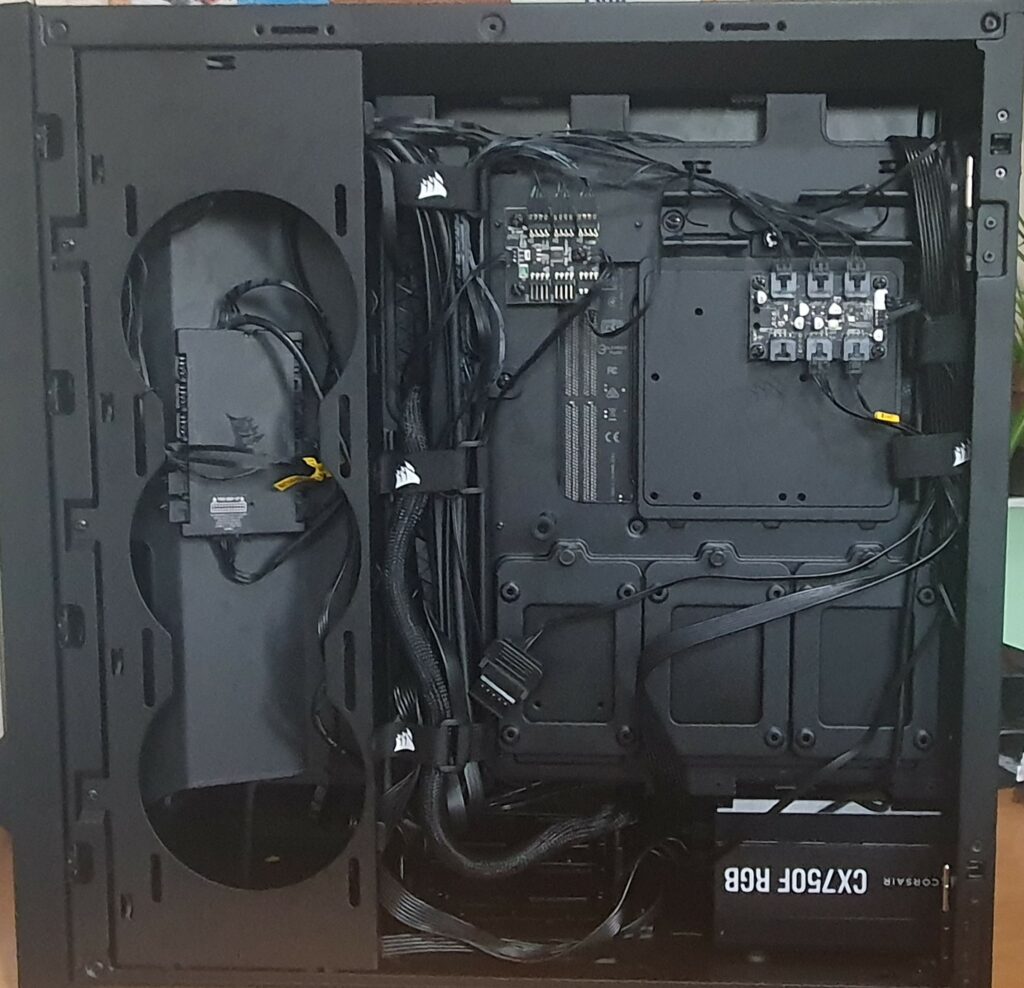
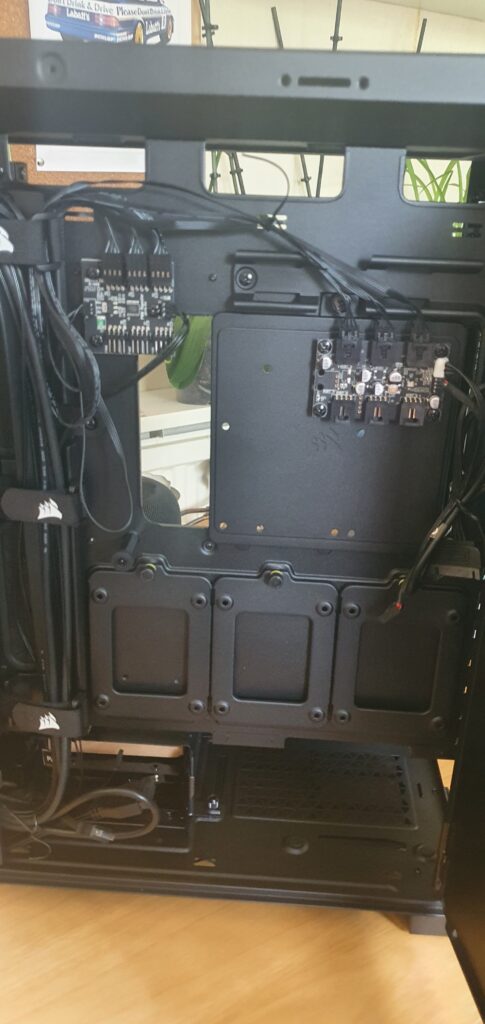
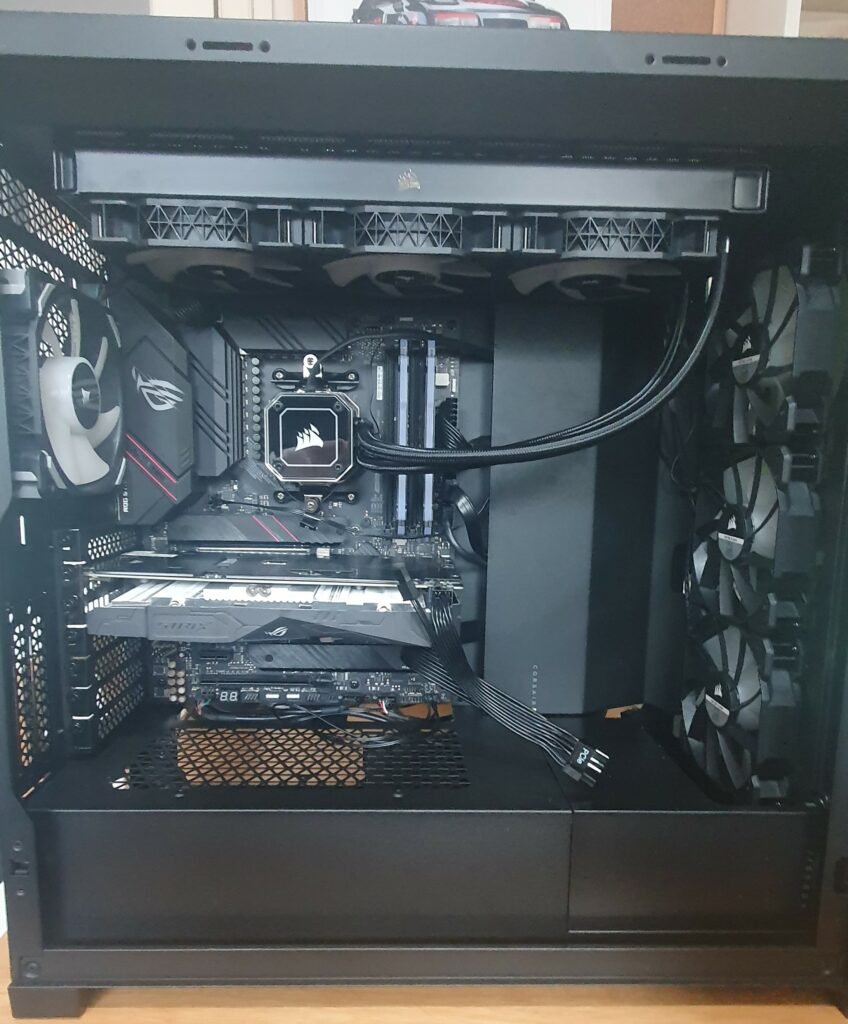
This last photo shows the PSU installed, along with the cooler’s fan control module which I mounted in the additional 3 fan slots. There is loads of room in the back for routing cables. The front fans, along with the two modules on the right were pre-installed by Corsair. I didn’t change these, but did add the additional ML fan and RGB connection for the PSU to these controllers. I chose to mount the PSU with the intake fan facing down, this was primarily to try and give an ‘under case’ neon lighting effect. All of this section though is covered by a door style panel which sits between the back of the motherboard and the glass panel case side. This panel will hide a multitude of sins, that’s for sure.
Hardware Build Summary
Overall I was impressed with the ease of putting together the system. The AIO cooler setup made water-cooling a simple task. I mean that is what it’s designed for after all. It would be nice if Corsair didn’t have cooling fins below the screw holes on the radiator though. It’s a nervous moment screwing the fans in knowing water and electronics don’t mix. The 5000X has plenty of channels for running cables, with slots at the top and bottom of the motherboard tray to route cables and connectors through. The addition of the locating pin for the motherboard is a really nice touch that makes mounting the motherboard a much simpler task. Cable management wasn’t a doddle but with so many channels and included ties it was easier than a basic case without anything. Given how often the CPU power socket is at the top of the board, and the PSU is at the bottom (I know not always), the CPU power cable could have done with being a touch longer to allow it to route down the side.
This build wasn’t for epic gaming response, it’s a daily driver PC for productivity and a mix of uses. I also wanted something that looked a bit special. I feel that the hardware all together, with all the RGB on there, the water cooling and cable management it does what I set out to achieve.
Cooling Performance
I was curious as to how much of a difference all of this would make. Although this is by no means scientific, it might give you an idea. Before removing the RAM, CPU and GPU from the old case, I took the following screenshot of the AI Suite software whilst a 12 thread process had been running the 12 threads at 100%. This was doing using the standard supplied Wraith Prism cooler. The case doesn’t have the same airflow properties as the 5000X, but there is an 80mm fan extracting hot air from next to the CPU.
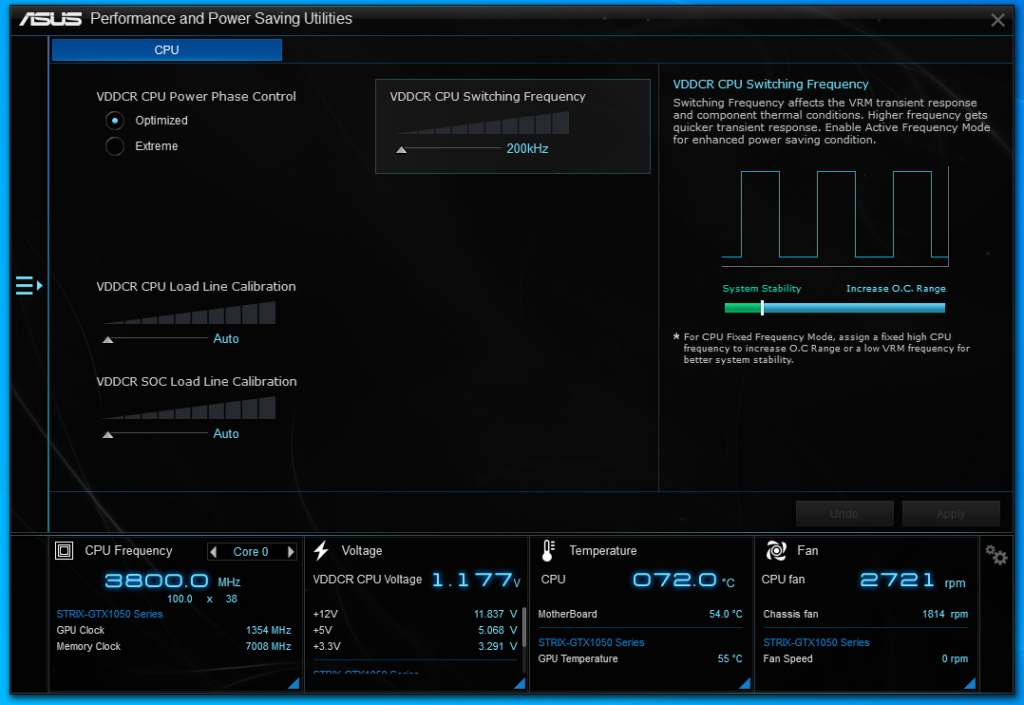
As you can see, the cores are locked to 3800MHz, and it’s running at around 72°C with 12 threads in use 100%. With the change in case, and addition of water cooling, running the same 12 thread process I am seeing the following
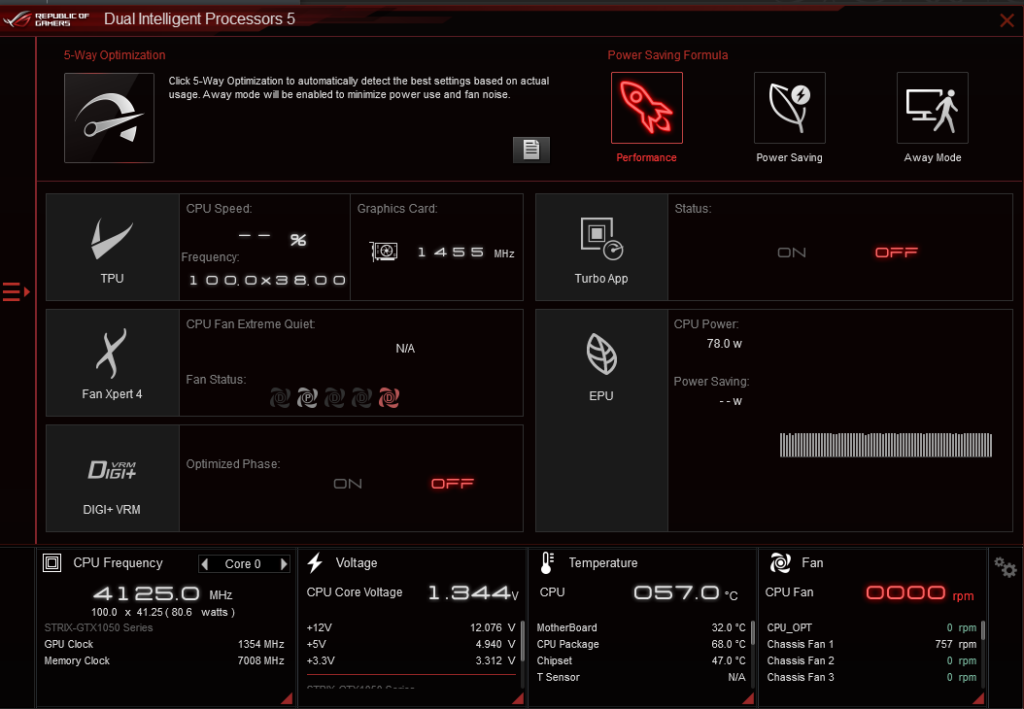
The screenshot above, again from AI Suite 3 shows auto overclock is running the CPU at 4125MHz. The screenshot shows a temperature of 57°C which is a spike. The normal operating temperature is 50°C. So, generally, I am seeing an overall decrease of 20°C in CPU temperatures. That’s quite impressive.
The other thing to note, with going to water-cooling and the 360mm radiator with 3 x 120mm fans is just how quiet it is! In the first screenshot you can see that the CPU fan is running at 2721 RPM. The pump is connected to the AIO header on the motherboard so that is why AI Suite shows 0 RPM for the fan speed. if I open up the iCUE software, you can see the fans are running at less than 50% of the speed of the Wraith
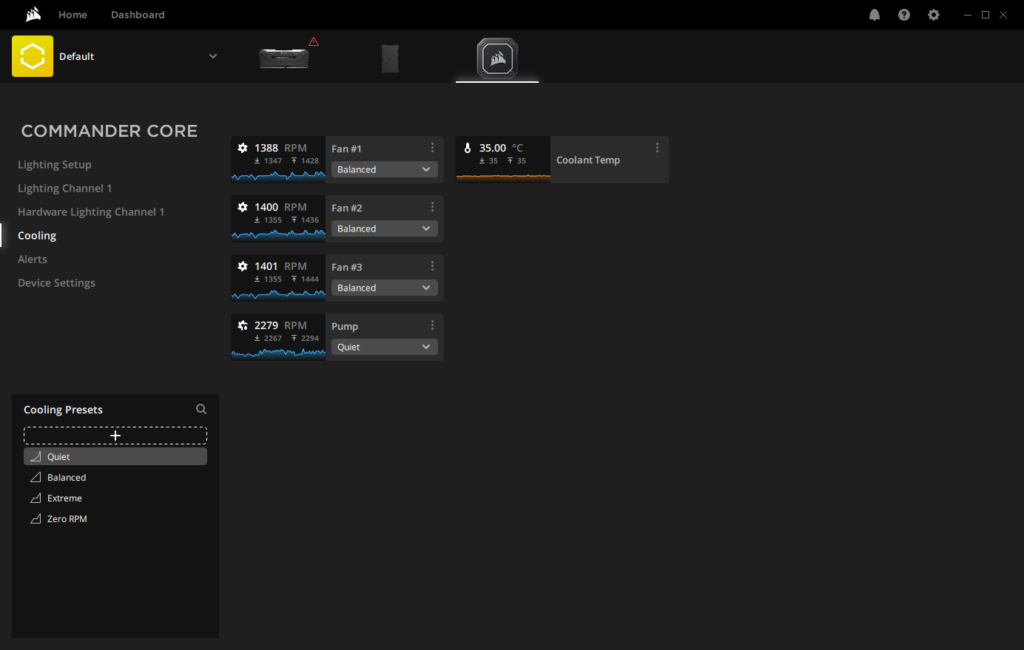
This combination where the fans are running at half the speed means there is no where near the same level of noise. Noise reduction for a daily drive PC is always a good thing. Yes I could have gone Noctua, but water-cooling is … well … cool. I will keep refreshing AMD’s store and see if I can get a 6700XT for MSRP. I don’t need the ultra high FPS for gaming, but I do make use of 2 x 2K monitors which the 1050 does seem to be able to drive OK for normal use.