
So, I’ve known that this feature was incoming for a little while and it’s had me giddy! I’ve been excited about it! I wanted it there and then. It’s part of why I am pushing for domain controllers to be upgraded from Server 2008 R2 and older (yes, some people still use these). Now it’s finally in a preview from Microsoft, I am like a kid in a sweet shop where everything is free!
If you already use Azure AD and already use Self Service Password Reset (SSPR), something I have not yet covered on this blog, you will already have some of the benefits of this feature. Now, with the installation of an agent on your domain controllers, you can gain protection from using weak or stolen credentials, or even create your own banned list (Company Name, project names for example). So, lets take a look at this feature that gets me giddy.
To use this, your Domain Controllers must be at least Windows Server 2012 (I push for Windows Server 2016 or Windows Server 1803). You will also need an Azure AD tenant. If you haven’t already (we have covered alerting via OMS which uses this), you can create one for free at https://azure.com. From https://aad.portal.azure.com on the left menu, select Azure Active Directory, then select Authentication Methods. This will open the blade where you configure the banned password feature. The screen below shows this blade layout.
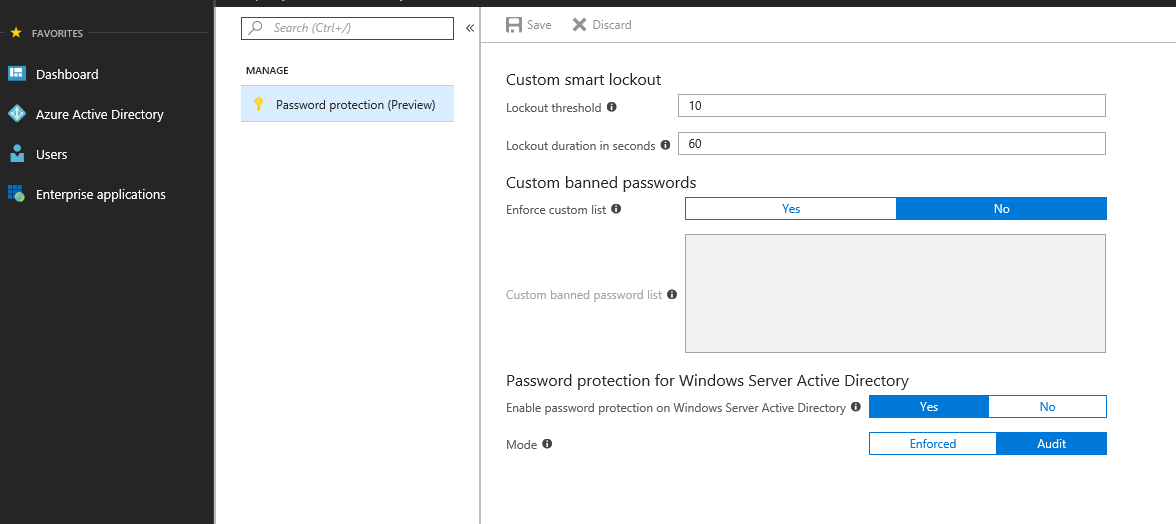
As you can see, there isn’t a lot to it. There is the option to Enforce custom list. This list is the custom list that you will use with easy to guess passwords relating to your environment. This could be project names, locations, company names etc. You have two options for this Yes use them or No don’t. Next we have the goodness that we’ve been waiting for. The option to apply protection to Windows Server Active Directory!
Again, the options here are simple, enable/disable the feature (who’d want to disable this?!) and the mode to use. If you enforce the setting, you cannot use passwords that are on the banned list. Attempts to use these passwords will be logged. If you run it in Audit mode (I suspect a lot of well established environments will do this before enabling it), it will only log the fact that a banned password is being used.
So What is Required
At the moment, this solution is in preview. It COULD change before it’s out of preview. As it stands, there are three main components to the solution. There is an agent that needs to be installed and configured on the domain controllers. There is a proxy server solution that is required. This removes the need for your domain controllers to communicate directly with the internet. The Domain Controllers connect via the Proxy to the Banned Password solution. Lastly we have PowerShell scripts that are used to gain insights to the use of the solution.
Downloads
Download the components for the solution from the Microsoft Download Centre. These downloads are very small at 1.7MB and 1.6MB each.
Proxy Service
The first part to install is the Proxy Service. During the preview you are limited to a maximum of 2 proxy servers per forest. So you need to make sure you position them where all your domain controllers can reach either one. Once you have provisioned your server to run the proxy service, copy the downloaded Proxy MSI file to the server then execute:
msiexec /i AzureADPasswordProtectionProxy.msi
Note: You can add “/quiet /qn” to install it completely silently. With the proxy service installed, we configure it via PowerShell
Import-Module 'C:\Program Files\Azure AD Password Protec
tion Proxy\Modules\AzureADPasswordProtection\AzureADPasswordProtection.psd1'
Get-Service AzureADPasswordProtectionProxy | Fl
Ensure that the service is running. With the software installed and the service we can register the proxy service. If your account is a domain admin account you can drop the $forestAdminCreds and -ForestCredential parameter:
$tenantAdminCreds = Get-Credential
$forestAdminCreds = Get-Credential
Register-AzureADPasswordProtectionProxy -AzureCredential $tenantAdminCreds -ForestCredential $forestAdminCreds
With the Proxy registered with AAD, we need to register the proxy with the forest. If you’re running with DA credentials, again you can drop the ForestAdminCreds and ForestCredential parameter.
$tenantAdminCreds = Get-Credential
$forestAdminCreds = Get-Credential
Register-AzureADPasswordProtectionForest -AzureCredential $tenantAdminCreds -ForestCredential $forestAdminCreds
This forest registration process doesn’t modify the schema, rather uses an existing container and serviceConnectionPoint object. By default, the proxy server listens on a dynamic RPC port. If you have strict network requirements and are unable to use the RPC dynamic range, you can use the following command to force it to use a particular port:
Set-AzureADPasswordProtectionProxyConfiguration –StaticPort
Restart-Service AzureADPasswordProtectionProxy
With the above completed, configuration of the proxy is done. Next is to start deploying to the Domain Controllers.
Domain Controllers
Deploying the software to the domain controllers will incur some downtime. Post installation a reboot is required to start using the new password filter dll that gets installed. Deployment is simple though. Install the software and that’s it. Once the software is installed it locates the proxy using the Service Connection Point created earlier.
msiexec /i AzureADPasswordProtectionDCAgent.msi
Again you can add “/quiet /qn” for a silent installation. The installation will invoke a reboot at the end, you can prevent this by using “/norestart” (or select “no” if you’re going through the installer wizard) as well then schedule the reboot at a time that suits you.
It’s worth bearing in mind that this does not need installing on any RODC’s due the fact that they do not set passwords, this should only be installed on your writeable DCs.
Monitoring
A lot of the monitoring is done via the event log. If you use OMS or some other Event Log correlation software, start importing the log found at [Applications and Services Logs]\Microsoft\AzureADPasswordProtection\DCAgent\Admin. Using your chosen tool you can do counts of the various event IDs that get logged
| Status | Password change | Password set |
|---|---|---|
| Pass | 10014 | 10015 |
| Fail (custom password) | 10016, 30002 | 10017, 30003 |
| Fail (Microsoft password) | 10016, 30004 | 10017, 30005 |
| Audit (fail custom password) | 10024, 30008 | 10025, 30007 |
| Audit (fail Microsoft password) | 10024, 30010 | 10025, 30009 |
One thing I did find from testing was that the events were logged twice, this could be because I inadvertently registered my forest twice but it’s something to check in your environment.
What does this look like
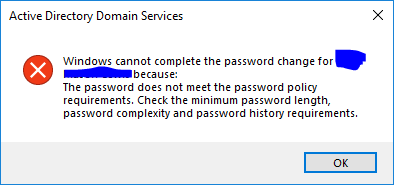
So now I’ve set up the Banned Passwords feature, I have tried to change a password through AD Users and Computers and this is what is returned. At the time of writing it’s not possible to customise the message to state it was a banned password rather than failing policy.
Gotchas!
So, playing around with this, I was struggling to find a password that had been compromised, was over 14 characters long and met complexity so I added a string to the custom list which has a limit of 16 characters!
Summary
It really was easy to set up and configure. I will follow this through to when it comes out of preview and in to GA, at which point I will be pushing this harder. Nice work Microsoft. If you want to learn more about the solution, check out the Microsoft official documentation on Microsoft Docs.